Categories
Images on the Web Luna Tech Support VRC

Creating Media Group Folders in Luna

Folders can be used to organize multiple media groups created in Luna. Folders can contain single media groups, or can house multiple sub-folders.

  1. To begin creating the main folder, select the gray “Create Folder” button in the top middle section.
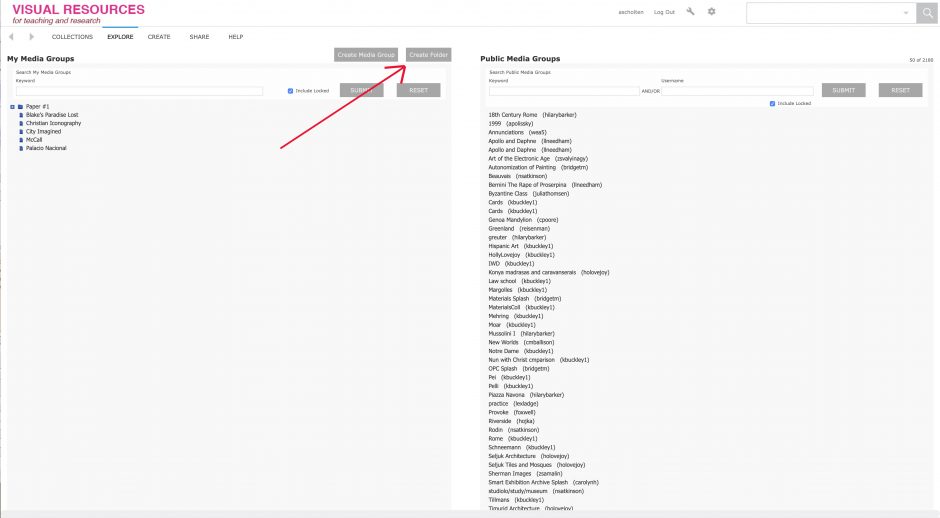
2. Name your folder, making sure that none of the “Parent Folders” are selected. Hit submit.

3. The folder now lives under “My Media Groups”. By hovering the cursor over the name and selecting one of the icons to the right, you can create a new sub-folder, edit the main folder, delete the folder, or create a media group.
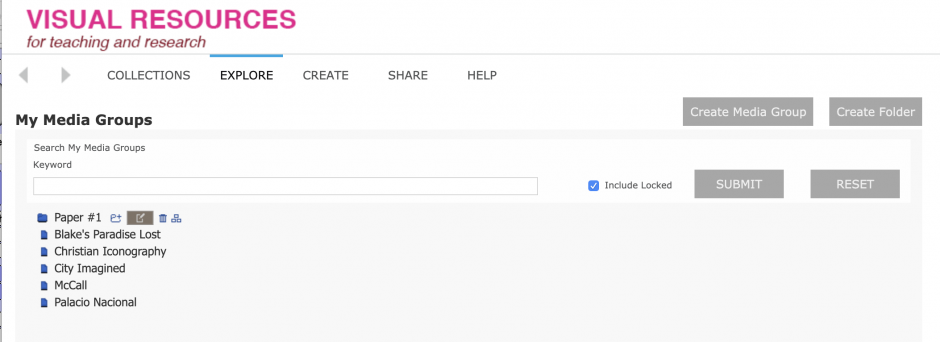
4. To create a media group within the main folder, select the icon with three squares.
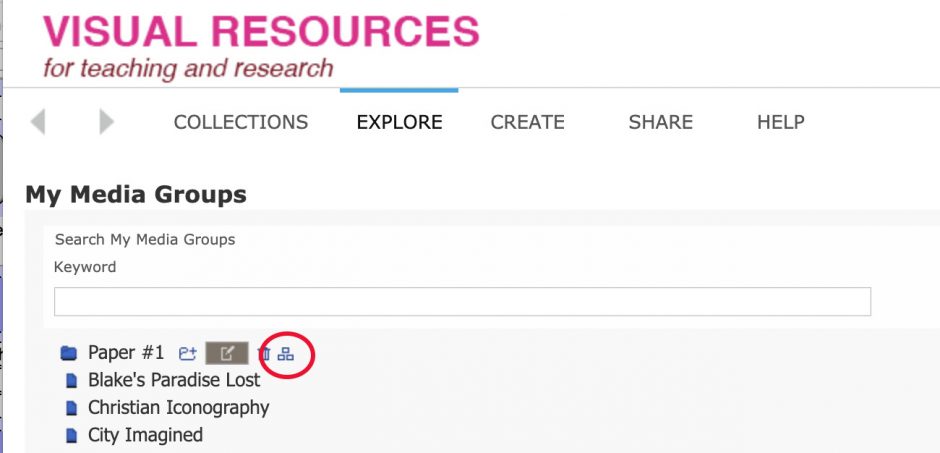
This brings up a window to name the media group and select the folder it lives in. Click save. This group functions like any other Luna media group, storing a selected set of images.

5. To create a sub-folder, select the icon of the folder with a + sign.
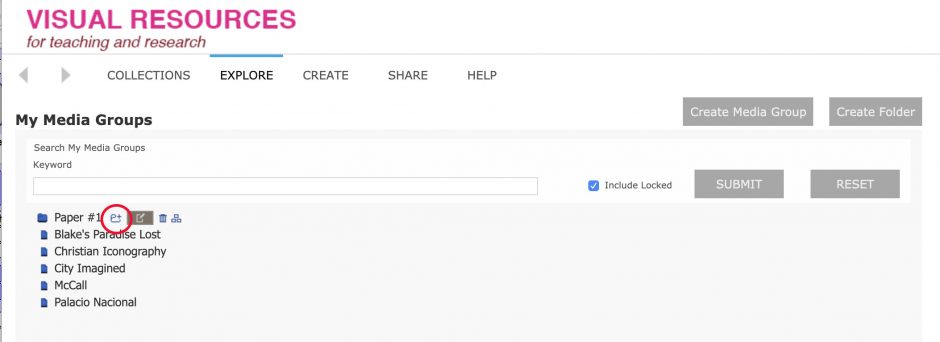
6. This opens a window to name the sub-folder and select the Parent Folder it lives under. Be sure that a Parent Folder is highlighted. Click submit.
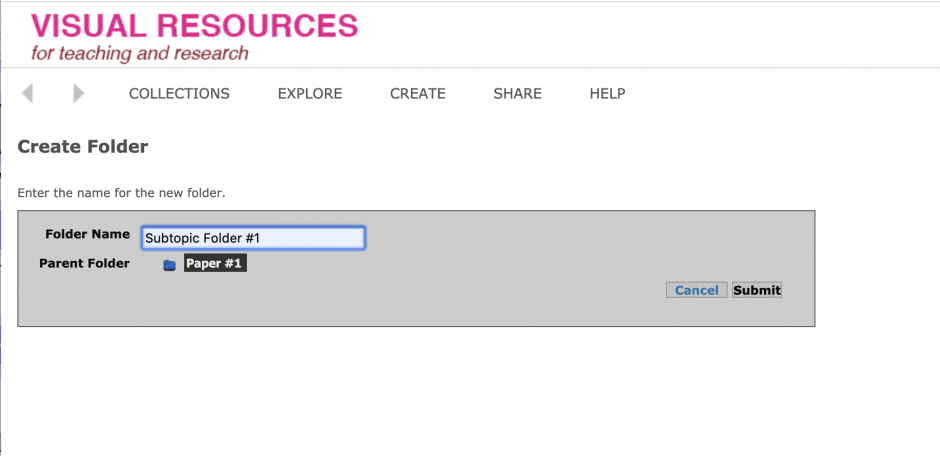
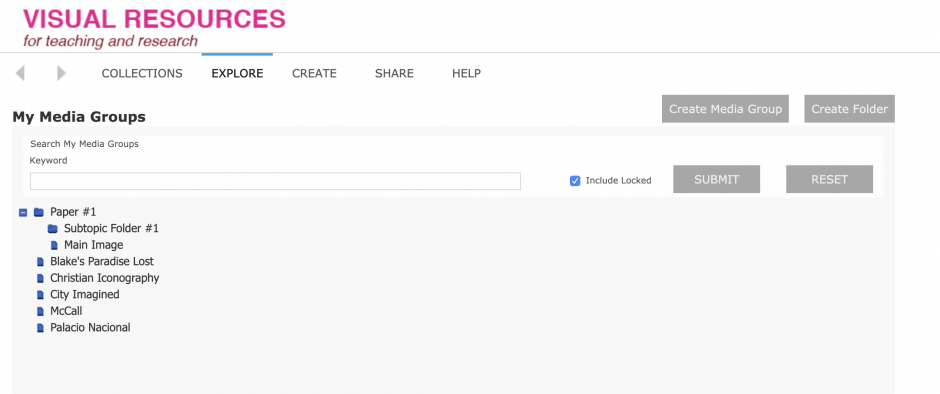
7. Expanding the parent folder will reveal any sub-folders and media groups it houses (i.e. parent folder “Paper #1” houses sub-folder “Subtopic Folder #1” and the media group “Main Image”). Subfolders can be used like main folders: hovering over the name will reveal the icons that allow you to create a media group or another folder within it.
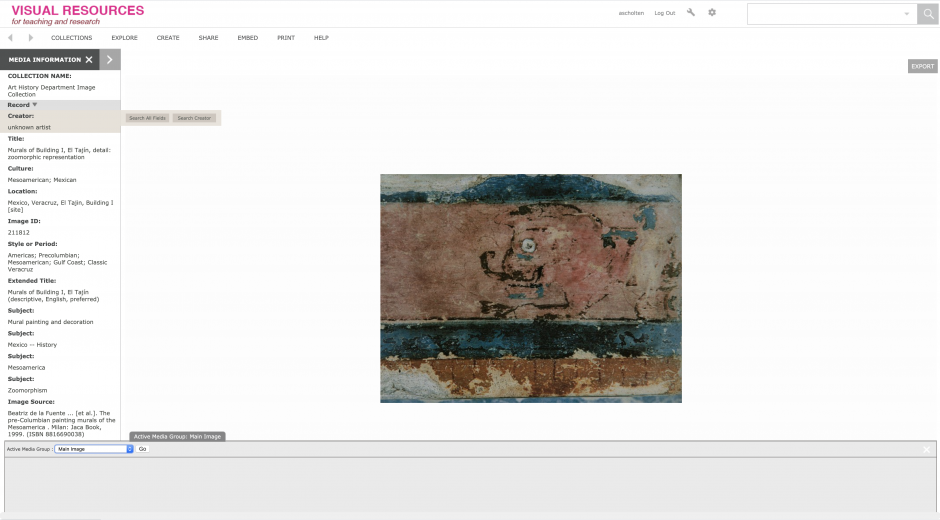
As you are working with multiple folders, be sure that images are added to the correct media group through the “Active Media Group” tab at the bottom. You can toggle between which media group you want to save the image to via the blue drop down menu. 
Categories
Luna Tech Support VRC

How to Create a Luna Module in Canvas

View and share your images directly within Canvas! Creating a Luna Module in Canvas is a great way to provide your students with easy access to sets of images for review and close-looking. You could also use it to share a bank of images for test prep or assignments.

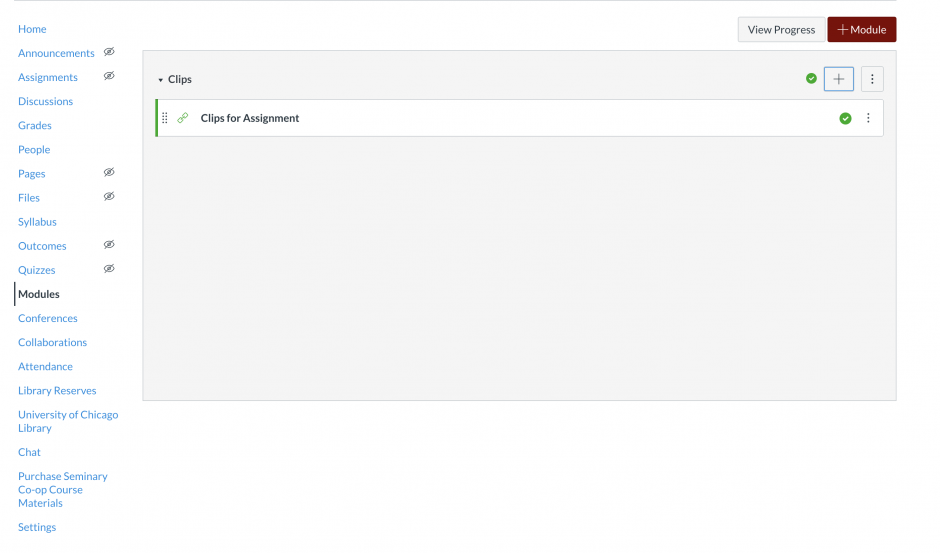
  1. Under the “Modules” tab on the left task bar, start by either creating a new module for your Luna collection, or working with a pre existing module

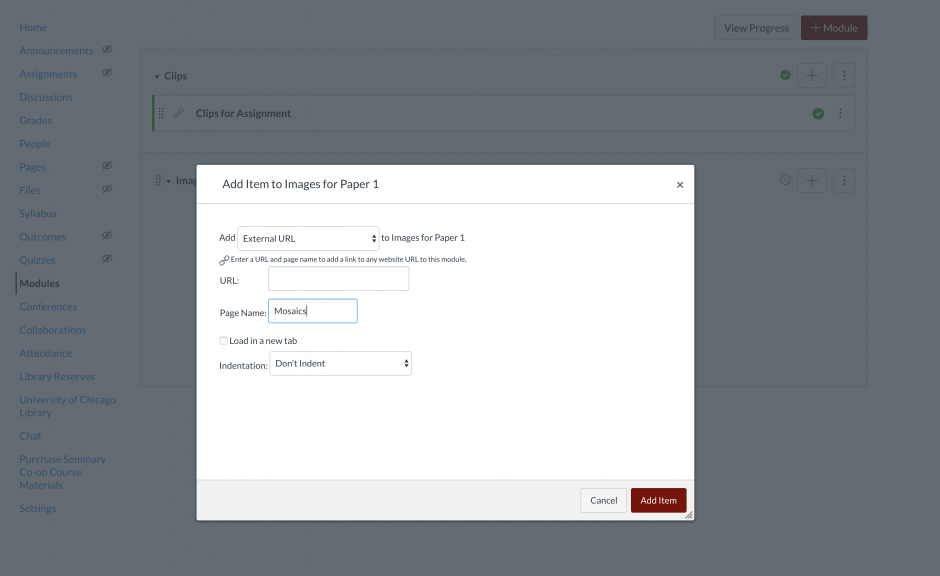
2. Add an item to your selected module by clicking the + button, select add “External URL” from the drop-down menu and name your group of images.

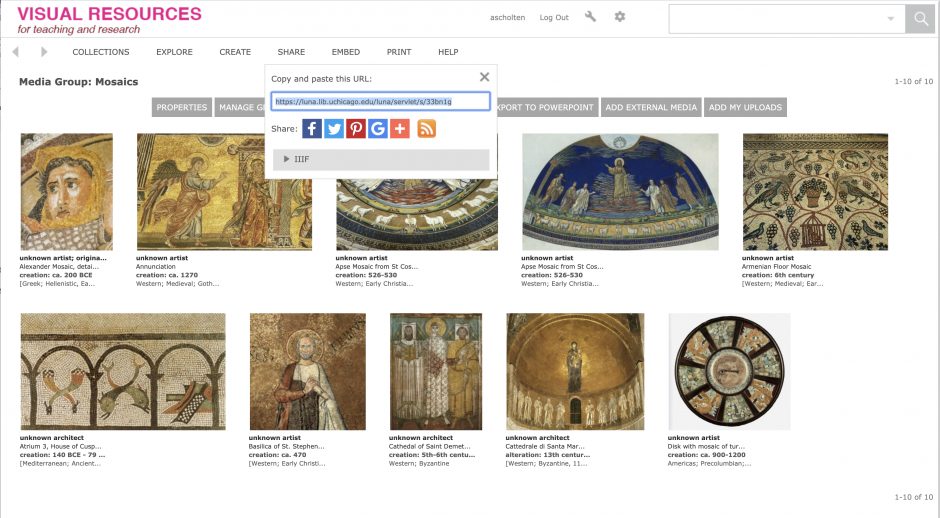
3. To get the URL for your LUNA images, open the group and select “Share” from the top menu and copy the provided URL.

4. Paste this URL in the Canvas menu and complete by clicking the red “Add Item” button.

Optional: checking “Load in a new tab” will open Luna in a new browser tab instead of within Canvas.

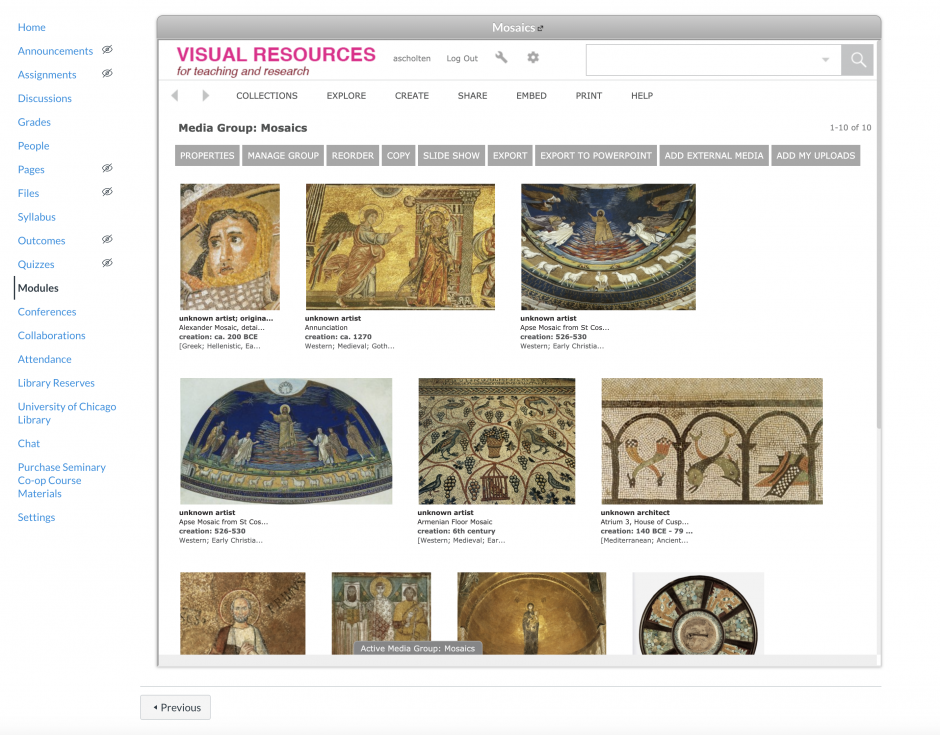
5. Be sure to publish both the new item and the overall module it lives under. Once published, clicking on the item title will open the interactive Luna module within Canvas. The module acts similarly to Luna’s full website, but allows direct access to a curated set of images. Like the website, image records can be explored individually within the module, and images can be downloaded via the “Export” button. 


Categories
Image Quality Photography Powerpoint Tech Support VRC

Photoshop Actions

Are you spending too much time with repetitive tasks in Photoshop? Photoshop actions allows you to record a process and save that information as an action which you can then use for other tasks down the road. Not only that, you can edit actions after the fact and customize them to suit your needs.

While you can make an unlimited amount of actions, including color correction, below is an example of how to resize images ideal for Powerpoint. Take some time to plan the steps of the actions before recording.

1. Select “New Action” from the bottom right of the Actions window. Title the action and click “Record.”


2. To resize the image, go to the Image menu and select Image Size. Change the resolution to 150dpi.


3. Now SAVE AS a JPEG to a specific location on your computer.

4. Finally, click the “Stop” button at the bottom left of the Actions window. You can now use this action on individual images by pressing the “Play” button or Batch Process an entire folder.


Categories
ARTstor Tech Support VRC

ARTstor No Longer Requires Java

Good news for ARTstor image users! ARTstor has eliminated the need for the Java plugin to download images from their digital library. ARTstor writes:

After our update, users who download single image files will receive a zip file that contains a JPEG image and an HTML file with the associated metadata. In addition to removing the need for Java, using zip will allow ARTstor to pursue other feature enhancements, such as additional options for image group downloads.

Mac users should have a problem, but PC users might have to install software to unzip the image folder. ARTstor suggests using 7Zip if you’re one of the affected users. Please feel free to contact the VRC if you’re having any issues downloading images from ARTstor.

Via ARTstor Blog

Categories
Luna Scheduled Maintenance Tech Support

Intermittent Access to LUNA, Thursday March 28th

LUNA will be undergoing scheduled maintenance on Thursday, March 28th from approximately 11a (central) to 1p.

During this time, we suggest using ARTstor for your image needs. If we can help with anything, please don’t hesitate to contact the VRC.

Categories
Luna Tech Support

LUNA is now available

Update: All collections in LUNA are now available on- and off-campus. Thank you for your patience!

Categories
Software Tech Support

Changing Text Box Background Color in Photoshop

Are you trying to add labels to maps, charts, drawings, or other images in Photoshop? Are you finding it impossible to change the background color of your text box?

If so, that’s because it is impossible! Photoshop does not have this functionality. There is a workaround, however, if you’d like to continue working with your image in Photoshop:

First, create your text box by selecting the “T” tool from your Photoshop Toolbox.

You can change the size, style, and color of your font from the top menu.

Next, find your Rectangle Tool. It may be hidden behind a tool that looks like a forward slash (/). To switch tools, mouse over the / icon and hit control, then select the Rectangle Tool.

Using the Rectangle Tool, draw a box around your text. You can adjust the color and opacity from the top menu. If you don’t see an option for opacity at top, you can change the opacity from the layer adjustment tools at right.

You can then send the box you made behind the text by going to Layer > Arrange > Send Backward.

By default, each time you create a new object or text box you will create a new layer. You may want to flatten the image periodically, if you know that you won’t be making further adjustments to some boxes/text. You can also learn more about managing your layers in CS6 by viewing this tutorial.


Categories
ARTstor Scheduled Maintenance Tech Support

ARTstor Outage, January 26 – 27

From ARTstor:

Please be advised that ARTstor will be performing an upgrade to our systems beginning on Saturday, January 26th at 11:00 PM EST and concluding on Sunday, January 27th at 1:00 PM EST. While the upgrade is being performed, users will not have access to the ARTstor Digital Library.

During the outage, please consider using LUNA instead for your image needs. If you experience difficulties with ARTstor after 1:00 PM EST on Sunday, try clearing your cache. If that doesn’t work, please contact userservices@artstor.org.

Categories
ARTstor Software Tech Support

ARTstor Java Problems When Downloading Images

It’s been reported that Mac users are having problems downloading images from the ARTstor Digital Library due to an outdated or deactivated version of Java.

If you are using Apple OSX 10.7 or later, you will need to install the latest version of Java and allow it on your browser. If you are using Mac OXX 10.5 or 10.6 and are unable to download images, Java may have been deactivated, so all you have to do is re-activate it.

If you are encountering problems downloading images from ARTstor and these solutions aren’t helping, please do not hesitate to contact us!

Categories
Tech Support

Changes to JSTOR’s Image-Search Feature

Previously, JSTOR allowed users to limit results by image—while this feature isn’t going away, it has changed in their most recent update. In order to search images, users will need now to key-word search on the caption field from the Advanced Search page. The drop-down menus to the right of the search boxes have a “caption” option, which will return content with images.

The screen shot below shows JSTOR’s advanced search page with “captions” selected from the drop down menu:

 The results from this search all have images with a caption that contains the keywords.

If you have any questions about finding images in JSTOR or elsewhere, please feel free to contact the VRC!