Saving Images in LUNA

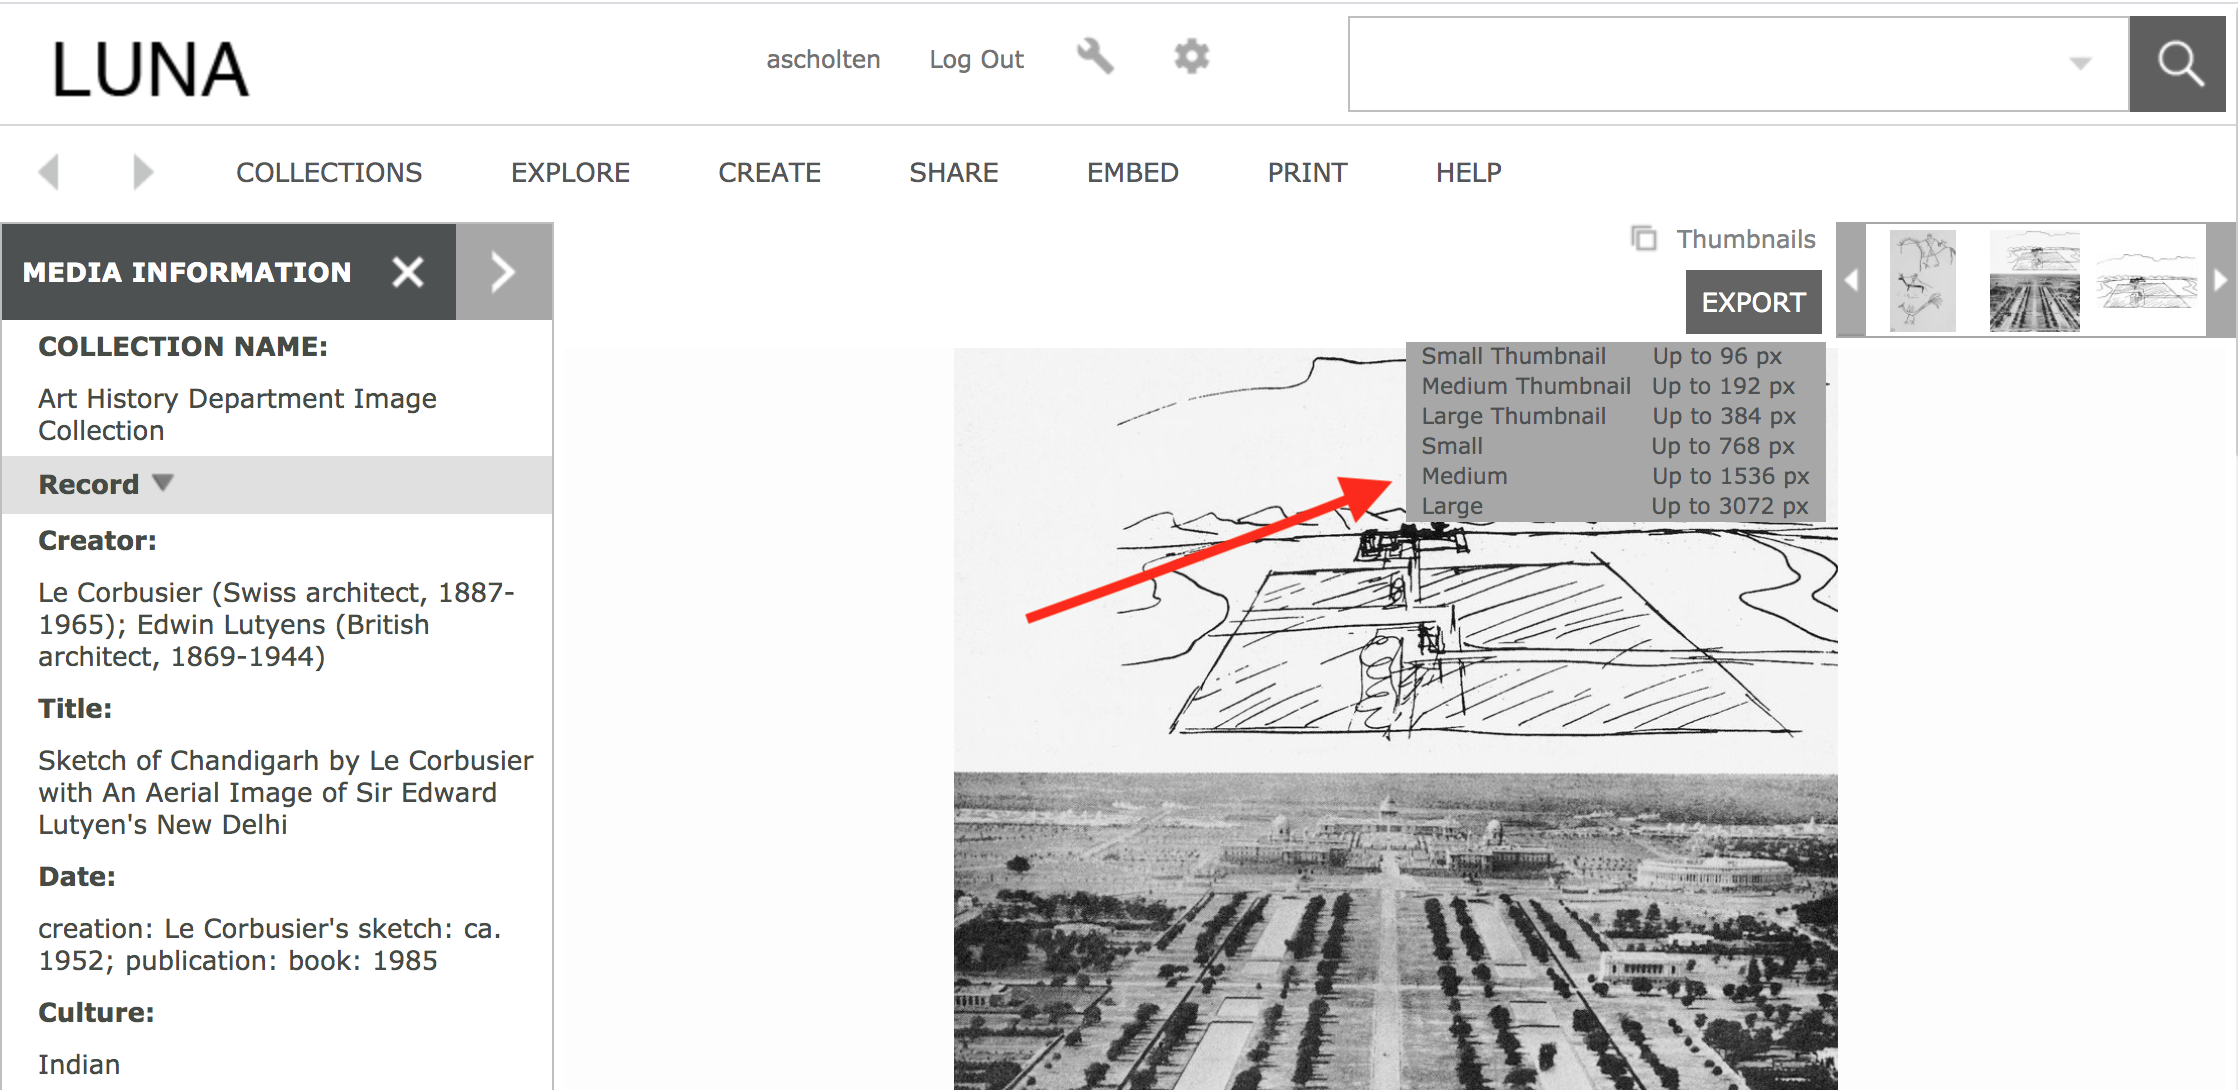
For Saving Single Images in LUNA:

  • Once you find an image you want to save, click on the thumbnail. This will give you a larger-sized image with cataloging information.
  • Double-click on “Export” button in the upper right corner.
  • Select the desired pixel size
    • If the image is going to be displayed in PowerPoint, at least 1500 pixels is sufficient.
  • Save the file to a specified location.
  • Unzip the downloaded file. The image is inside the folder and can be dropped into PowerPoint at this point.


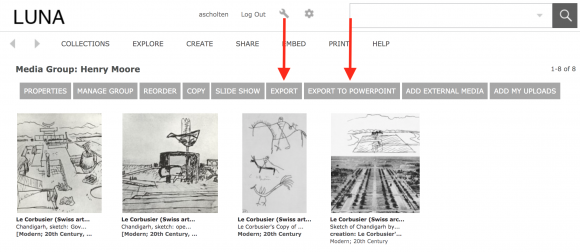
To Save a Group of Images in LUNA and Export to PowerPoint:

  • Either open a media group or create a new one. For information on media groups, see LUNA’s video tutorial here.
  • The entire set of images can be downloaded from here by clicking the “Export” button at the top of the media group.
  • Once the media group contains all the images you want, in the order you want, click on the “Export to PowerPoint” button.
  • This will bundle the set, open PowerPoint, and populate a new slideshow with both images and cataloging data.


ARTstor Introduces Saved Searches

ARTstor recently added a feature to save searches within the  ARTstor Digital Library. The theory behind this feature is that with ARTstor’s growing collections of content, it’s highly likely that additional results for your search parameters will become available in the future. By saving your search, you can quickly get an updated pool of results when you run it again.

In order to use this feature, you must be logged into your ARTstor account.  For more information on creating an ARTstor account, click here. ARTstor describes how to save your searches:

After you perform a search, you will see an option to Save this search in the upper right of the thumbnail page of search results. Click on it, then click Save and enter a name for your saved search. You can save up to 30 searches.

To run a saved search record, click My saved searches near the search box on the front page of the Digital Library or on a search results page.

Done with a particular saved search? To delete it, click on My saved searches, then click on the X next to the search you want to delete. You’ll see a prompt asking if you want to delete it; click Yes and you’re finished.

Via ARTstor Blog

VRC Winter Quarter Office Hours

The VRC is now holding office hours from 3-5pm on Mondays and Thursdays! VRC staff will be available during these hours for you to drop by with your questions about finding and using images in your research or the VRC’s scanning equipment.

In addition to these office hours, we are available for both drops in and scheduled appointments during our regular business hours of 8:30a–5p Monday through Friday.

Image: Hyde Park, 57th Street Art Fair, 1950. University of Chicago Photographic Archive, apf2-09219, Special Collections Research Center, University of Chicago Library.

Changing Text Box Background Color in Photoshop

Are you trying to add labels to maps, charts, drawings, or other images in Photoshop? Are you finding it impossible to change the background color of your text box?

If so, that’s because it is impossible! Photoshop does not have this functionality. There is a workaround, however, if you’d like to continue working with your image in Photoshop:

First, create your text box by selecting the “T” tool from your Photoshop Toolbox.

You can change the size, style, and color of your font from the top menu.

Next, find your Rectangle Tool. It may be hidden behind a tool that looks like a forward slash (/). To switch tools, mouse over the / icon and hit control, then select the Rectangle Tool.

Using the Rectangle Tool, draw a box around your text. You can adjust the color and opacity from the top menu. If you don’t see an option for opacity at top, you can change the opacity from the layer adjustment tools at right.

You can then send the box you made behind the text by going to Layer > Arrange > Send Backward.

By default, each time you create a new object or text box you will create a new layer. You may want to flatten the image periodically, if you know that you won’t be making further adjustments to some boxes/text. You can also learn more about managing your layers in CS6 by viewing this tutorial.


Importing ARTstor Citations into EndNote

Did you know that you can export citations from ARTstor and import then into EndNote’s desktop citation management software? You can!

If you don’t already have EndNote desktop, you can download a trial license or purchase it through University of Chicago’s IT Services Solution Center at a discounted prince.

After you’ve installed EndNote and created a new citation library, you’ll need to download the ARTstor filter from  in order to install it in EndNote. Once the filter is installed, open the image group that you’d like to cite, and then go to Tools > Save citations for image group.

Next, go to Tools > View and Export Citations. Under Export Options, select “Directly Export Citations into EndNote.” At this point, you can choose to export all of the citations from the image group or make a selection. Click Go.

A small window will open asking whether you would like to save or open the file. Click Open. This will launch EndNote.

EndNote will ask if you want to save the citations to an existing library or create a new one. Select your choice. Another window will open, asking you to choose a filter—select the ARTstor filter you just installed so that the metadata from ARTstor will fall into the right fields in EndNote’s program. Your EndNote library will open with the newly imported citations.

You can add thumbnail images to EndNote records: After you’ve exported images from ARTstor, open a citation record, and click on the symbol for Charts to upload the image file. (If you attach the image file to the PDF section of the record, the file will be saved with the record but no thumbnail will appear).

For more information, visit the ARTstor page on Citing Images. If we can help with anything, or if you have any questions about managing image citations, please don’t hesitate to contact the VRC!

Excluding Terms from Searches in LUNA and ARTstor

Are you looking for images of artwork in a certain style or time period, but keep retrieving the same artists over and over? Want to exclude some of the more well-known artists in order to delve more deeply into a topic? Excluding certain words and phrases when searching in databases is often essential. No matter the scenario, the following strategies in LUNA and ARTstor can help you find what you’re looking for.

Excluding Terms in LUNA Searches

In LUNA, Boolean operators don’t work the way you might expect. The “NOT” operator is absent from the advanced search, and it doesn’t work quite right in a keyword search, either. But you can still find what you’re looking for via the following steps:

  • Use a dash (-) to exclude a term from an existing search result. If you want to exclude a phrase, you must put a dash in front of every word.
  • Do not use quotation marks.
  • Example search: house -Frank -Lloyd -Wright (to find houses designed by architects other than Frank Lloyd Wright).
  • As always, these terms entered in the keyword search box will only search the collection you have currently selected. To select a new collection, go to “Collections” in the menu bar and select from the list at left.


Excluding Terms in ARTstor Searches

  • ARTstor allows you to exclude words and phrases using the Boolean operator NOT. This function works best when used in the Advanced Search.
  • To exclude certain words from an advanced search, select “NOT” from the drop-down menu at left. If you are excluding a phrase, be sure to use quotation marks.
  • Example search: house NOT “frank lloyd wright” (in creator field)

For more LUNA tutorials, click here. For more ARTstor tutorials, click here. Questions? Feel free to contact us!


Sharpening an Image in Photoshop

Do you have an image that is out-of-focus? The Sharpen tool in Photoshop can help!

Open the image in Photoshop. Zoom in (Select View from the menu and go to Actual Pixels for best results).

The image, at 100% zoom, looks blurry. The letters appear fuzzy.

To sharpen, go to Filter > Sharpen, and select Sharpen or Sharpen More.

As you can see, the edges are crisper and the legend is easier to read after sharpening. You can sharpen as many times as is necessary, but make sure that the image doesn’t begin to look pixelated. This is a sign of over-sharpening.


How Do I Unzip a Folder of Images?

You’ve downloaded a zipped folder of images from LUNA or Webshare – what now?

PC Computers

If you’ve ever had trouble unzipping a compressed folder of images on your computer, please see the following links for instructions on different PC platforms.

Windows XP

Windows 7

Windows Vista

Mac Computers

If you’re using a Mac running OS 10.5 or later, the pre-installed tool called Archive Utility will unzip folders and files by default. After downloading a zipped file or folder, you should see a dialog box that asks if you’d like to open with Archive Utility. Select OK.

The unzipped folder should then be available in your Downloads folder, or wherever you specify downloads to save.

If you are not prompted to open the folder with Archive Utility, try downloading and then double-clicking on the folder or file to unzip.

Please contact the VRC with any questions.


PowerPoint Shortcut: Loading a Folder of Images

On a PC, it’s easy to load a folder of images directly into PowerPoint. With your presentation open, click on Insert in the menu bar, then click on Picture, then New Photo Album… This option lets you select an entire folder of images to add to your presentation. To learn more, download the VRC’s Powerpoint Manual for PC (pdf).

Macs do not have a built-in photo album option. You can, however, install a simple program to import a folder of images. For a free version of this program, please contact the VRC. Let us know what version of PowerPoint you are using (i.e. PowerPoint 2007, 2008, 2011) and what operating system you have (i.e., Mac OS 10.5).


Teach and Present with the iPad 2

Tired of lugging your laptop from class to class? Try teaching and presenting with your iPad 2 instead! The iPad 2 can connect to a projector through a VGA adapter, just like your laptop. You can open PowerPoint and Keynote presentations in the Keynote app for iPad. Here’s what you’ll need:

Once you’ve navigated to your presentation online (or in Keynote), click to open. If loading from the web, click again on “Open in Keynote.” Keep in mind that some formatting may be lost in translation from PowerPoint to Keynote, or from your laptop to your iPad. See this guide from Apple Support on best practices for creating a presentation on a Mac for use on an iPad. Some quick tips:

  • The simpler your presentation, the more likely it will open properly on iPad.
  • Swipe or tap iPad’s screen to switch slides.
  • Presenter notes will show up on iPad, but you must select that option from the menu at upper right.
  • Use simple fonts; unrecognizable fonts will automatically be replaced with Helvetica.
  • Resize images before inserting them in your presentation; this allows for quicker download.
  • Do not plan to transmit audio; currently projection from iPad 2 only works for video.
  • The first generation iPad does not support projection or mirroring.

You may also use iPad 2 to present media groups or slide shows in LUNA. LUNA mirrors from iPad 2 seamlessly! Contact the VRC if you’d like a demonstration.

Unfortunately, iPad is not yet fully compatible with ARTstor but you can access some ARTstor functionality on iPad with their mobile app.

PLEASE NOTE: Your iPad displays all passwords character-by-character as you enter them. Right now there is no way to change this option. Wait until you have logged in to Chalk, email, LUNA, or other websites before connecting iPad 2 to the projector.

If you have any questions about teaching with iPad 2, or if you’d like to borrow an iPad 2 and adapter to try out the possibilities, please contact the VRC.